So all I've been doing with this blog is posting nail art tutorials, and I know (because I'm like this) that a lot of times I just want to see a pretty polish all on its own, or a nail design without a tutorial because I've been doing this long enough I can usually figure out how the person did the nail art on my own.
I figure many of you are probably the same way or at least similar to what I want in a polish blog, so I'm going to be mixing up tutorials with product reviews, polishes on their own, and nail designs without tutorials.
Feel free to email me or comment on something you wanna see in the future, or a tutorial on a design I posted that didn't have one!
And a big thanks to everyone who has followed or commented, I know I'm just starting out in the nail blogging world, and it means a lot :)
February 27, 2012
February 24, 2012
Stripes!
So for this mani I used some double ended polishes my sister bought me (isn't she a sweetie?) that have a regular brush on one side and a striper brush on the other. So I used the polishes with the thin brush for these stripes. I also did purples on my left hand, blues on my right, but the middle blue stripe is a little hard to see.

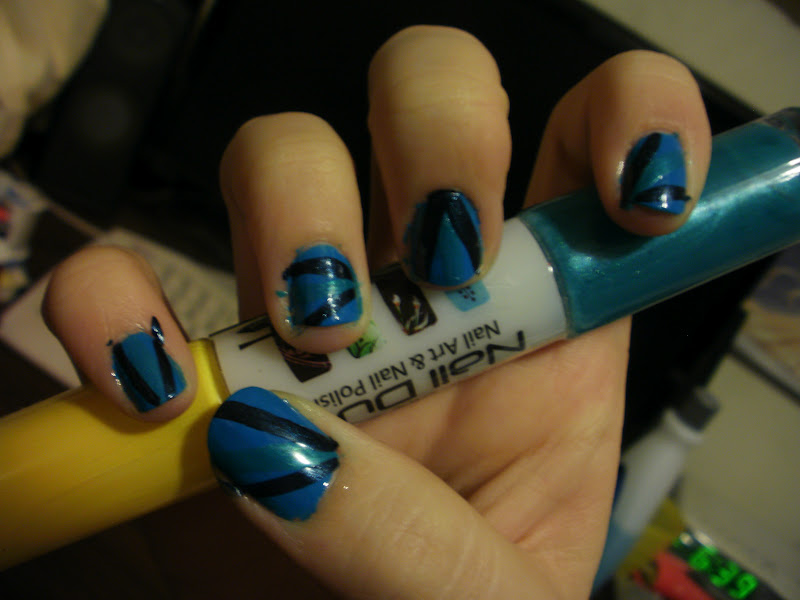
Here's the supplies I used:
*these nail duo polishes really don't have names, sorry, I got them at the dollar store
Right hand:
- Sally Hansen Hard as Nails Xtreme Wear, Blue Me Away!
- Nail Duo polish teal & yellow (teal side)
- Nail Duo polish dark blue & dark purple(dark blue side)
- Sally Hansen Hard as Nails Xtreme Wear, Blue Me Away!
- Nail Duo polish teal & yellow (teal side)
- Nail Duo polish dark blue & dark purple(dark blue side)
Left hand:
- Revlon Top Speed, Orchid
- Revlon Top Speed, Orchid
- Revlon Top Speed, Lily
- Nail Duo polish periwinkle & fuchsia (fuchsia side)


First paint all your nails with the base color(s) you've chosen.

Then start adding stripes. I did all the stripes in different directions on each nail, but it's up to you.


Add a top coat and that's it! I hope you enjoyed, and if you try out this design tell me what you think in the comments.
February 17, 2012
Green-Grey-Black Marble
This is a manicure I did quite a while ago and haven't had a chance to post yet, but it's one of my best marbling jobs. Sorry if the photos are crap, I'm just gonna put them all up here anyways. I took these after dark and my room has terrible lighting, so that's why the colors are off, I just wanted to show how the marbling looks.


After a few days, when 3 nails had chipped, I replaced them with french tips of the 3 polishes I used in the original marble. I really like this look, actually.


After a few days, when 3 nails had chipped, I replaced them with french tips of the 3 polishes I used in the original marble. I really like this look, actually.


February 10, 2012
Valentine's Hearts
I know this isn't original or anything, I just wanted to do it for myself and thought I'd share it with you guys, too. Sorry I forgot to take a photo of the final design, I put a glitter polish over the hearts. You can see it in the video though, at this link.

So the base color is a light pink by the Color Workshop (no name for the color). I think I did 2 or 3 coats, since you can tell it's very sheer.

Then, I used a regular small paintbrush and acrylic paint for the hearts, purple and silver. Use whatever you like or have, that works for you.


So the base color is a light pink by the Color Workshop (no name for the color). I think I did 2 or 3 coats, since you can tell it's very sheer.

Then, I used a regular small paintbrush and acrylic paint for the hearts, purple and silver. Use whatever you like or have, that works for you.

February 3, 2012
Snow & Trees
There isn't much snow anymore here in Canada, but we always get more in February/March so I don't think it's too out of season to post this manicure.

Next time I try this design, I'm going to pick a nude polish that stands out more; this one you can barely see against the orange.
Here's the supplies I used:
- Revlon Top Speed, Peachy
- Muse, NP-8 Natural
- Colorshock, #NP002
- Wet N Wild Fast Dry, Party of Five Glitters
- Clear or top coat

First, paint all your nails orange.

Then, make a bumpy design like a snow pile on all your fingers but the middle one with a nude polish.


Retrace that design in white a little farther down the nails and add a tree shape with nude polish on your middle finger.


Using a toothpick or dotting tool, pick out a large hexagonal silver glitter and place it at the top of the tree on your middle finger with some clear polish.

Add a top coat, and you're done!


Subscribe to:
Posts (Atom)