This french tip manicure turned out very well, even on my right hand. I love this design, and already I want to do it again in the future!
I used a light blue by Essence with a dark nail striper, and a glitter polish from Ardene called (you guessed it) Blue Blizzard.
I don't have pics of every step, but paint a french first, line it with the striper and load on your glitter.
This side pic is to show you guys how I cut my nails. For a while, I had them like this, and I LOVED it, until one broke, and I cut them all to match :( Anyways, if you can't tell from the pic I cut the sides of the white part of my nail, so they'd be squarer, if that makes any sense...you can see on the side view where my nail bed is my nail slopes down, and then it goes up? I cut it that way, it used to keep sloping down, covering more of my fingertips.
December 7, 2012
November 30, 2012
Purple V Tips
This was a fun, but simple design that's almost a quick, plain manicure with a bit of style.
First, paint your base color on all nails except your accent nails (I chose thumb and ring fingers).
Make a V shape with the base color on those accent nails, and then add a shorter V with a contrasting or complimentary color.
And here's the finished manicure!
First, paint your base color on all nails except your accent nails (I chose thumb and ring fingers).
Make a V shape with the base color on those accent nails, and then add a shorter V with a contrasting or complimentary color.
And here's the finished manicure!
November 23, 2012
Roses & Butterfly Mani
I'm sad that I missed two of the biggest holidays for nail designs: Halloween and Thanksgiving, but I've been soooooo busy the last several weeks. Here's a nail design that turned out way better than I thought, and I want to do something similar again soon!
I used these polishes:
Here are pictures of the plates I stamped with:
(The rectangular plates are an unnamed brand I got on eBay, just search for "oblong nail plates", I got the 12 pack, there's also and 18 pack)
Sponge on the first layer of gradient.
Sponge on a darker color to continue the gradient.
And stamping time :) I did some leafy flowers all in green to just look like a bunch of leaves, then a rose with part pink and green polish, then the purple butterfly on my thumbs only.
Labels:
color shock,
gradient,
green,
pink,
purple,
sally hansen,
sponging,
stamping,
wet n wild
November 2, 2012
Cute Pumpkins
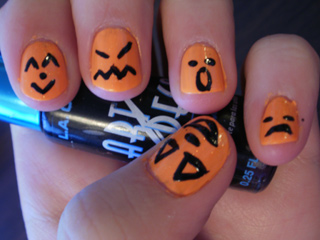
I know this is late, and not very original, but I had fun with this mani and wanted to share it with you guys.
Paint your nails orange first.
I added some orange glitter, which could also be added after the pumpkin faces so that the black polish sparkles too.
Have fun with the faces you paint; feel free to google pumpkin carving for inspiration!
Paint your nails orange first.
I added some orange glitter, which could also be added after the pumpkin faces so that the black polish sparkles too.
Have fun with the faces you paint; feel free to google pumpkin carving for inspiration!
Labels:
halloween,
kleancolor,
orange,
pumpkin,
wet n wild
September 28, 2012
Blue Chevron Tip
* For this post I re-sized my images ahead of time, so they won't enlarge when you click on them, but I hope that this will make my posts load a lot faster on your computers :) And it takes less time to upload the photos on my end too!
So on to the manicure: this is a nude polish with a blue funky french and rhinestone accents.
The polishes I used are an unnamed pinky nude by Profusion, Billie Aqua, and Nyx Ocean.
And of course a rhinestone wheel and a dotting tool (any size) to pick up the rhinestones with.
Here's what the chevron tip looks like on its own.
Yes, I see the smudge on my middle finger. I don't remember how that happened, but you girls are way more careful doing other stuff with wet nails than I am, right? Lol
Tell me what you think in the comments! Should I have used a black or white rhinestone instead of the same color blue? Or even something like lime green or fuschia? What colors would you do this design in?
September 21, 2012
Brown and Gold
This is gonna be a short post; I was just experimenting with this new brown polish I got, and this combo ended up being one of my faves. It's called Cafe Au Lait by Nyx and the gold flecks is Essie As Gold as it Gets
Here is Cafe by itself.
Close up.
Here is Cafe by itself.
Close up.
September 14, 2012
Crackle over Glitter
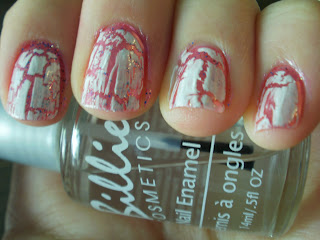
This manicure was super fun, and super easy! I love experimenting with crackle in different ways. This time I was trying crackle over a very glittery polish to see how much of the sparkle would show through.
The base is an unnamed Wet N Wild pink polish, Sally Hansen Rockstar Pink, and Cherimoya crackle polish in Innocence.
Here's the base color on its own, very pretty.
A good layer of glitter.
This is the matte crackle finish with no topcoat. Tell me in the comments below if you like the shiny one at the top better, or this glitter/matte combo.
Labels:
cherimoya,
crackle,
glitter,
pink,
sally hansen,
wet n wild,
white
September 10, 2012
Sally Hansen Complete Salon Manicure Polishes Review
I know everybody's probably seen these already; they're nothing new. I just wanted to share swatches of the colors I have, and my opinion on them.
First up, Yellow Kitty. This one is fairly sheer, I think I did 2-3 coats. I have to say I really love this soft yellow.
Gray by Gray: a perfect bluish gray, I LOVE this color! This is 2 coats.
Raisin the Bar: Very sheer, I think I did 3 coats (first pic is only one coat)
Even after any number of coats I still see brush strokes :( Maybe it's just my bottle, but this gorgeous color is kind of ruined for me because of that.
My FAVORITE PINK EVER! This is Frutti Petutti, one coat.
Grass Slipper, the best yellowy green I have in my collection (the pics lower down are more accurate of color, this one not so much). The only thing is, it stains SO bad, wear a base coat under this one for sure.
This happened a while ago, I've only ever seen a few polishes do this, and usually SH polishes never do. This is the shade of green that Grass Slipper really looks like:
Tell me in the comments which color is your favorite, or if there are any you have that you'd recommend I buy!
September 6, 2012
Green Ruffian Manicure
I have another ruffian for you guys today, these are so easy to do and a little more nail art-y than just a plain color, I love ruffians! Anyways, this one is with a medium and dark green (that looks black most of the time, but it is green).
This is the base color, first coat. This is Flat Iron Green by NYC
The second color is Sew Psyched by Essie.
Sorry about the lighting in these; it was late at night so I had my lamp on for extra light, but it ended up being too much! lol Below is 3 or 4 coats (I forget haha) of Flat Iron Green.
This is the base color, first coat. This is Flat Iron Green by NYC
The second color is Sew Psyched by Essie.
Sorry about the lighting in these; it was late at night so I had my lamp on for extra light, but it ended up being too much! lol Below is 3 or 4 coats (I forget haha) of Flat Iron Green.
And then the ruffian.
I so should've added a matte top coat to this, but I didn't. Maybe I'll have to recreate this manicure just to see what it looks like mattified!
Subscribe to:
Comments (Atom)


