Pages

December 30, 2011

Star Pedicure

Here's a sparkling design for your toes on New Years!

Here's the supplies I used:

- Billie, Turquoise
- Kleancolor Nail to Toe, Mr. Right
- Sally Hansen Xtreme Wear Hard as Nails, Disco Ball
- Art Deco, Black
- Art Deco,White
- Clear or top coat


First, paint your toenails pink. I also added a layer of white glitter all over.


Then draw the outline of the star on your big toe with a black striper. I smudged some on my cuticle as you can see, but I'll get that later with some polish remover.


Fill in the star and do the same on your other foot. The one on my right toe is kinda messed up, I'm sure you guys will do a better job.


On your other toes, paint a black curve near the tip, coming from the left side on your left foot, the right side on your right foot. Also paint a white curve opposite the black.

Fill in the star with white.
 
Add more glitter as you desire. I used a glitter striper for outlining the stars and curves.
sorry for the blurryness!

December 27, 2011

Pink & Blue Flowers & Good News!

This is a bonus post mainly cuz I have something I wanna show off! lol (Sorry for the picture quality, I took these with my iPod since I kinda lost my camera...)


So the polish I'm wearing is Raisin the Bar, part of the Sally Hansen complete salon manicure line. The ring is what I wanted to show off, my boyfriend proposed on Christmas morning!!!!


I also added some nail stickers to it:


Here's a couple more pictures of the ring, but for those of you who don't care, this is the end of this post as far as nails are concerned. I hope everyone had a great Christmas :)


December 23, 2011

Glitter Layering

This manicure isn't particularly Christmas-y but glitter always seems to go well with the holidays, I think.


Here's the supplies I used:

- Revlon top speed, Metallic
- Claire's, Mystical
- Colorshock, NP041
- Wet N Wild, Party of Five Glitters
- Clear or top coat


 Here's Metallic by itself:


First I added Mystical:


Then the colorshock glitter:


And then Party of Five Glitters:


After 9 days of wearing this (I almost never ever wear a manicure that long - I really loved this one) here's what it looked like. Almost no wear at all! I was very impressed. All you can see is some new nail growth by my cuticles, and two nails had minor chips at one corner.


December 16, 2011

Christmas - Red, Green & Gold

I did get another Christmas design in yay! Anyways, I was wearing Sally Hansen's Grass Slipper for a few days before I decided to hide some of the chips with a new design, and here it is:


Here's the supplies I used:

- Sally Hansen Complete Salon Manicure, Grass Slipper
- Miss B Rainbow, #75
- Kleancolor Nail to Toe, Mr. Right NOW
- Kiss Nail Art Paint, Gold Glitter (sorry I forgot it in the picture!)
- Clear or top coat


First, paint all your nails green. Feel free to use a darker, more Christmas-y green; I was just already wearing this one.


Then, paint a swish of red on the right side of the tips of your nails.


Next, outline your red sections with a gold striper. I actually used 2 different ones. The Kiss one is a yellowy gold with more glitter, and the Kleancolor striper is a paler gold with less dense glitter as well as multicolored fine glitters in with the gold.


Whoops - my top coat smudged my thumb there lol


And I did my right hand with the red parts near my cuticles instead of near the tips of my nails, but feel free to do them both the same. You can kinda see the Kiss striper here and how different it is from my Kleancolor one.


December 9, 2011

Snowflakes

Here's my first Christmas design for 2011! I'm hoping to do at least one more before Christmas day, but we'll see.

Here's the supplies I used:

- Colorshock, NP002
- Art Deco, White
- Claire's, Mystical
- Clear or top coat


First, paint a white french tip on your index, ring, and pinky nails. You can use a regular white polish like I did, or a striper polish for this.


Then, draw the snowflakes with a white striper on your thumb and ring nails.


 Add detail to the snowflakes.


Put a layer of blue glitter over everything.


And you're done! Don't forget a top coat. (sorry for the blurry picture below)

Here are some better ones:


December 2, 2011

Ruffian Manicure

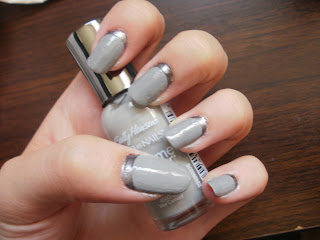
If you liked the look of the half moon manicure I did two weeks ago, you'll love this one! It's essentially the same as the half moon, but reversed.


Here's the supplies I used:

- Billie, Platinum
- Sally Hansen Hard as Nails Xtreme Wear,Wet Cement
- Clear or top coat
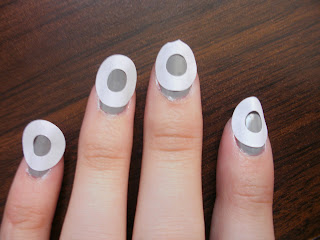
- 3 hole paper reinforcements


First, paint all your nails grey, or whatever color you want to show on most of your nails.


Next, stick on the reinforcements. You only have to press down the part closest to the base of your nail - you could even cut these in half and only use 5 instead of 10 for both hands, I was just lazy haha


Paint the exposed part of your nails, making sure to overlap onto the reinforcement - that's what they're there for, after all!


I had to use two on my thumb, and then smooth out the point in the center with the first grey polish after the darker grey dried.


Carefully peel them off before the polish dries, or it'll pull pieces of dried polish off with it if you wait.


And that's it! Don't forget your top coat.